


|

This post contains affiliate links.
Why You’ll Love This Recipe
Every year when the 4th of July rolls around, I end up deep in a whirlwind of grill marinades, patriotic decorations, and trying to keep everyone hydrated and entertained. It's fun, chaotic, and somehow always feels like it's over in a flash. Somewhere along the way, I found a recipe that keeps me grounded: chocolate-covered pretzel rods. These festive little treats are easy enough to make with one hand while adjusting your outdoor string lights with the other—and they’re the perfect activity to do with kids.
I originally made these for a last-minute neighborhood party (one of those "Can you bring a dessert?" texts the night before). I needed something quick, impressive, and kid-approved. These pretzel rods delivered—and they've become a tradition ever since. I like to pair them with other festive desserts like Red Velvet Bundt Cake, Mini Vanilla Cupcakes with Ombre Buttercream Frosting, or Lemon Buttercream Frosting topped treats.
If you're building out a themed dessert board, they also look great beside Star-Shaped Chocolate Graham Crackers, Chocolate Covered Strawberries, and my 4th of July Charcuterie Board. Honestly, they’re one of the easiest party desserts I’ve ever made—and they’re always the first to disappear.
Watch how I make this recipe
Why You'll Love These
- No oven required
- Takes just 20 minutes
- Super kid-friendly (both to eat and to help make)
- Make-ahead friendly
- Customizable for any occasion
They’re also fantastic to pair with summer drinks like Watermelon Margaritas with Frozen Watermelon or add to treat baskets with Unicorn Chocolate Chip Cookies and Funfetti Bundt Cake.


Tools That Make It Easier
One of the best parts about easy recipes is that they usually only require a few kitchen tools or simple equipment. At least, that is the case for this simple chocolate- covered pretzel rods recipe anyway.
- Wilton candy melts pot
- Spatulas
- Piping bags
- Piping bag ties
- Baking sheet
- Parchment paper sheets
- Tall Dipping Container

What You’ll Need From Your Pantry
Simple recipes usually also mean that only a few simple ingredients are needed which is delightful for so many reasons. Fewer ingredients is easier on both the party budget and the clean up that is to come after prepping and cooking.
- 1 bag Pretzel rods
- 1 bag White candy melts
- 2 teaspoon Coconut oil
- 1 cup Royal blue candy melts
- ½ teaspoon Coconut oil
- ½ cup Red candy melts
- ¼ teaspoon Coconut oil
- Star Sprinkles: Red, White, & Blue

Before You Start: My Quick Tip
- Use a tall container to get even candy coating.
- Coconut oil helps keep the candy smooth and shiny.
- Chill between layers to prevent smearing.
- Work in small batches if you’re multitasking grill duty and dessert prep.
- Skip the piping bag altogether and use ChocoDrizzlers for a clean drizzle.
- Involve kids in the sprinkle step—it's their favorite part!
- If you're taking these outside to a hot party or BBQ, set your tray on top of a shallow container filled with ice—it helps prevent the chocolate from melting in the sun. I learned this one the hard way at a poolside party!
Need help packaging treats like a pro? Check out How to individually package chocolate covered Pretzel Rods go over everything from cello bags to cute gift boxes.

Latest Video

Let’s Make It Together
- Line a baking sheet with parchment paper.
- Melt white candy melts with 2 teaspoon coconut oil until smooth.
- Pour into a tall glass. Dip pretzel rods and place them on parchment-lined sheet. Chill 10 minutes.
- Rinse the pot, melt blue candy melts with ½ teaspoon coconut oil. Dip the top third of the pretzels. Add star sprinkles.
- Rinse again. Melt red candy melts with ¼ teaspoon coconut oil. Transfer to piping bag and drizzle over the white section.
Let the pretzels firm up completely. If your kitchen is hot (mine always is on the 4th!), chill them in the fridge between steps. This is also a great time to get your little ones involved—mine love choosing their own sprinkle combos or drizzling the red candy.

Recipe variations
You don’t have to stop at red, white, and blue! Switch up the color scheme for any holiday or celebration:
- Valentine’s Day: red, pink, and white
- Easter: pastels + mini chocolate eggs
- Halloween: orange, purple, green
- Christmas: red, green, and edible snowflakes
- New Year’s: black and gold with edible glitter
- Baby Showers: pinks or blues and pearlescent shimmer
I’ve even made Carrot Chocolate Covered Pretzels for Easter brunch to match my Carrot Bundt Cake—super cute and festive!


Cut, Serve, and Store It Like a Pro
You can make these up to 3 days in advance. Just store them in an airtight container with parchment paper between layers. Keep them at room temp, not in the fridge—pretzels can go stale fast from moisture.
Want to gift them? Wrap 3–5 rods in clear treat bags, tie with festive ribbon, and drop into a small basket with Peanut Butter Cookies, Chocolate Dipped Peppermint Sugar Cookies, or Mini Mermaid Chocolate Bars. I also have a video on How to Individually Package Chocolate Covered Pretzel Rods if you're planning to gift them or bring them to a party with kids—super handy for keeping them neat and grab-ready!

Why I Make These Every Year
These chocolate-covered pretzel rods are always a hit. I love that they add instant charm to the dessert table with minimal effort. Plus, I never have to worry about them melting like cupcakes do in the heat. They’re sturdy, portable, and gorgeous.
And the best part? They’re perfect for making with kids. Whether they’re helping you drizzle, sprinkle, or just taste-test along the way, this recipe is a joyful family activity in disguise.
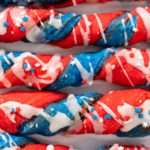
Chocolate Covered Pretzels for 4th of July
Video
Equipment
- Wilton candy melts pot
- Spatulas
- Piping bags
- Piping bag ties
- Baking sheet
- Parchment paper sheets
- Tall Dipping Container
Ingredients
- 1 bag Pretzel rods
- 1 bag White candy melts
- 2 teaspoon Coconut oil
- 1 cup Royal blue candy melts
- ½ teaspoon Coconut oil
- ½ cup Red candy melts
- ¼ teaspoon Coconut oil
- Star Sprinkles Red, White, & Blue
Instructions
- Start by measuring out all of your ingredients and lining a baking sheet with parchment or wax paper. This makes cleanup easier and helps the pretzels set nicely.
- Add the white candy melts and 2 teaspoons of coconut oil to your candy melting pot. Melt on high while stirring regularly with a heat-resistant spatula until smooth and silky.
- Once melted, pour the white candy into a tall glass or dipping container. This gives you a cleaner, more even dip.
- Dip each pretzel rod into the melted white coating, then lay them out on the parchment-lined sheet. Pop the tray into the fridge for about 10 minutes so the candy can firm up.
- While the white layer is setting, rinse out and dry your melting pot. Next, melt the blue candy melts with ½ teaspoon of coconut oil, stirring until smooth.
- Pour the blue coating into another clean tall container.
- Dip the top third of each chilled pretzel rod into the blue candy and immediately add your red, white, and blue star sprinkles. Chill again to help everything set.
- Clean and dry the melting pot one last time. Then melt the red candy melts with ¼ teaspoon of coconut oil, stirring gently until smooth.
- Transfer the red candy into a piping bag and secure it with a piping tie. Snip off just a tiny bit—about ⅛ inch—from the tip so you can easily drizzle.
- Drizzle the red candy diagonally over the white portion of the pretzel rods. Let them sit until fully hardened before serving or packaging.


Notes
From My Kitchen to Yours
July 4th Theme
- How to Make American Flag Chocolate Covered Pretzel Twists
- How to Make American Flag Mini Cupcakes for 4th of July
- Homemade Chocolate Graham Crackers in Fun Star Shapes
- Watermelon Popsicles with Chocolate Drizzle
- Fast Homemade Vanilla Cake Recipe – Bake and Frost in 3 Hours
- Pinwheel Cookies for the 4th of July


Pin It For Later

Food Photography & Video Tips from My Studio
Here’s a peek at the tools, gear, and camera setups I use to film my recipe videos and photograph food at home. Over the years, I’ve tested dozens of different setups, and now I’m sharing what actually works for me—whether I’m filming overhead shots for YouTube or styling still photos for my blog. If you’re curious about how I create the content you see here, these posts are a great place to start.


Leave a Reply