Unlocking the Secrets to Perfectly Releasing a Bundt Cake from Any Pan

This post contains affiliate links.

Every baker has their battles, and the Bundt cake pan can sometimes feel like a formidable foe. It’s not just about the taste—presentation matters too, especially when you’re hoping to impress. After many a ruined cake and enough stuck disasters to dub myself the Bundt-wreck master, I've finally cracked the code on the perfect pan release.
The key to a perfect release lies in the preparation and initial cooling process. Whether you’re baking for a cozy family gathering or a swanky professional event, the moment when the cake lifts flawlessly from the pan is a sweet victory indeed. In this post, I’ll share my battle-tested methods to ensure your Bundt cake is as stunning to look at as it is delicious.
Let’s dive into the secrets of seamlessly removing a Bundt cake from its pan, so you can say goodbye to the days of serving what looks like a crumble cake (delicious but decidedly not what we’re going for!). Whether you're a seasoned baker or just starting out, these tips will help you master the art of the perfect Bundt release every time. Looking for a festive challenge? Try your hand at my 4th of July bundt cake or the decadent Christmas Chocolate Bundt Cake with Chocolate Frosting next!

Preparation Before Baking
Proper preparation is the foundation of a successfully removed Bundt cake. It begins with greasing the pan meticulously. I prefer using a homemade butter-flour mix or a high-quality baking spray. Make sure to cover all the nooks and crannies of the pan to prevent the cake from sticking. You can find more detailed recommendations on which tools and products to use in my post on Bundt Cake Baking Tools and Equipment.
Choosing the right greasing agent makes a difference. For chocolate cakes, I sometimes use cocoa powder with butter to keep the final appearance clean and appealing. This technique not only enhances the flavor but also adds to the visual appeal, ensuring that the dark batter doesn't show white flour spots. For a different flavor profile, consider trying the Lemon Cranberry Bundt Cake with Sugared Cranberries, which offers a delightful tang complemented by a visually stunning presentation.

How to Grease Bunt Cake Pan

Baking the Perfect Bundt Cake
Baking the cake evenly is crucial. An oven that doesn’t distribute heat well can lead to uneven baking, which might cause the cake to stick to one side of the pan. I always recommend using an oven thermometer to ensure the accuracy of your oven's temperature. It's a small tool but makes a huge difference in baking.
Once the cake is in the oven, resist the urge to open the oven door too often. This can cause fluctuations in temperature that affect the rise and texture of the cake. Usually, a Bundt cake takes about 45-50 minutes to bake, but this can vary depending on the recipe and oven. For other tempting variations, take a look at the Pumpkin bundt cake with cream cheese frosting or the Carrot Bundt Cake with Cream Cheese Frosting, both of which are perfect for any season.
Knowing when the cake is done is just as important. I look for a deep golden brown color and the edges pulling slightly away from the pan. A good skewer test should come out clean with just a few crumbs attached. This indicates it's time to take it out and start the cooling process, which is crucial for a smooth release. For tips on maintaining your pan in top condition, check out my guide on How To Clean Bundt Pan.
These steps and tips, drawn from my personal experience, are sure to help you achieve a perfectly smooth release from the Bundt pan every time, just like they have for my Funfetti bundt cake and Red velvet bundt cake recipes. Happy baking!

Equipment
- Round Cooling Grid A round cooling grid is essential for ensuring that your Bundt cake cools evenly after it’s flipped out of the pan. The grid allows air to circulate around the entire cake, which prevents condensation from forming and potentially making the cake soggy. It also supports the cake gently, reducing the risk of breakage or deformation as it cools down.
- Heat Thermometer A heat thermometer is crucial for determining the exact internal temperature of the Bundt cake, ensuring that it is fully baked inside before removal from the oven. After baking, it can also be used to check when the cake has cooled sufficiently to be iced or cut. This tool helps avoid the common mishap of decorating a cake that is still too warm, which could cause icings and frostings to melt.
- Kitchen Towels Kitchen towels serve multiple purposes in the Bundt cake removal process. They can be used to safely grip and handle the hot Bundt pan when flipping it onto the cooling grid, protecting your hands from heat. Additionally, towels can be helpful to cushion the impact when flipping the cake, ensuring the cake doesn’t land too harshly and risk breaking apart.

Silicone vs metal baking pans

Instructions
- Cool the Bundt cake in the pan for 10 minutes after baking.
- Flip a cooling grid upside down and place it over the Bundt pan.
- Holding the cooling grid, flip the grid and the Bundt pan together. Use a kitchen towel to handle the pan if it is still hot.
- Slowly lift the Bundt pan upwards to release the cake onto the cooling grid.
- Allow the cake to cool for 2 hours before icing or cutting. Check the temperature with a heat thermometer to ensure it's fully cooled.

Troubleshooting Common Problems
What to do if the cake sticks
Even with the best preparation, cakes can sometimes stick. If this happens, don't panic. Gently run a flexible silicone spatula around the edges of the pan to loosen any stuck parts. A few taps on the bottom of the pan can also help dislodge the cake. For more stubborn cases, placing the pan in a warm oven for 5-10 minutes can make removal easier. This is a trick I’ve often used and shared in my How To Clean Bundt Pan post.
How to fix minor imperfections after the cake has been removed.
Occasionally, larger pieces of your Bundt cake might remain stuck in the pan even after you've flipped it. If this happens, don't despair—it's possible to salvage the situation with a careful approach.
- Carefully Remove the Pieces: First, gently remove any large pieces stuck in the pan using a butter knife or a small spatula. Be sure to loosen the edges carefully to keep the shape intact as much as possible.
- Reattach to the Cake: Once removed, fit these pieces back onto the cake like a puzzle. Press gently to ensure they adhere well. If the cake is still warm, the pieces might meld back into place as it cools.
- Seal with Frosting or Glaze: After the cake is reassembled, prepare a frosting or glaze as described in my Pumpkin Bundt Cake with Cream Cheese Frosting or Chocolate Bundt Cake with Chocolate Frosting recipes. Pour or spread it over the cake, focusing on covering the seams and any imperfections. The frosting or glaze acts as a 'glue', helping to hold the pieces together and giving the cake a smooth and finished appearance.
Bundt Cakes Recipes
Decorating and Serving Suggestions
Ideas for icing and decorating the cake once it is cooled
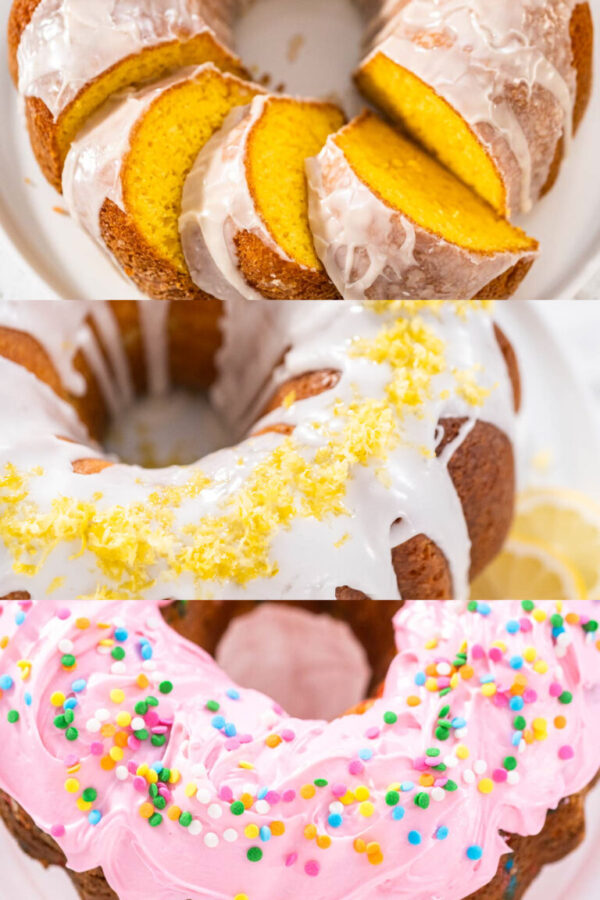
Once your Bundt cake has completely cooled, the real fun begins. I love experimenting with different icings and toppings depending on the season or occasion. For a touch of elegance, try a glaze like the one in my Lemon Cranberry Bundt Cake with Sugared Cranberries or get festive with the colorful sprinkles from my Funfetti Bundt Cake recipe.
Best practices for slicing and serving the Bundt cake
To ensure clean cuts, use a serrated knife and slice with a gentle sawing motion. Serving the cake on a cake stand not only makes it look more inviting but also makes slicing easier. If you’re serving cake at an event, pre-slicing it can save time and ensure each piece is beautifully presented.
Storing Your Bundt Cake: Ensuring Freshness and Flavor
Whether you’re enjoying leftovers or preparing your cake in advance, here’s how to keep it tasting fresh:
- At Room Temperature:
For short-term storage (up to three days), keep the cake under a cake dome or wrapped in plastic wrap on the counter. Your Bundt cake will stay fresh for up to 3 days. This method is perfect for cakes that will be eaten in a short period. - Refrigerate for Longevity:
Wrap the cake tightly in plastic wrap or store it in an airtight container if you need to keep it fresh for up to five days. It can last up to 5 days in the refrigerator. Remember to let it come back to room temperature before serving to ensure the best flavor. - Freeze for Future Enjoyment:
Freezing is ideal for extended storage. Wrap your Bundt cake securely in plastic wrap, followed by aluminum foil, and freeze. Before freezing, mark the packaging with a Sharpie to note the date. Your cake will remain fresh for up to 3 months in the freezer. Thaw it in the refrigerator overnight and allow it to reach room temperature before enjoying. This method is ideal for planning ahead or keeping leftovers tasting as good as new.
By following these detailed serving and storage tips, you can enjoy your Bundt cake at its best, whether it's freshly baked or saved for later. Proper storage ensures every bite remains moist, flavorful, and just as satisfying as when it first came out of the oven.


Conclusion
We’ve covered everything from the initial cooling to the joyful final touches of decoration. Mastering the removal of a Bundt cake from its pan is all about patience and practice. Whether your cake comes out perfectly or needs a little patching up, it’s all part of the baking journey.
I encourage you to try these techniques and share your results. Whether it's your first time or you’re a seasoned baker, I’d love to see your creations! Maybe give the Red Velvet Bundt Cake a try next, and let me know how it goes. Remember, every bake is an opportunity to create something wonderful. Happy baking and decorating!


How to Remove a Bundt Cake from a Bundt Pan
Video
Instructions
- Cool the Bundt cake in the pan for 10 minutes after baking.

- Flip a cooling grid upside down and place it over the Bundt pan.

- Holding the cooling grid, flip the grid and the Bundt pan together. Use a kitchen towel to handle the pan if it is still hot.

- Slowly lift the Bundt pan upwards to release the cake onto the cooling grid.

- Allow the cake to cool for 2 hours before icing or cutting. Check the temperature with a heat thermometer to ensure it's fully cooled.

Nutrition
Food Photography & Video Tips from My Studio
Here’s a peek at the tools, gear, and camera setups I use to film my recipe videos and photograph food at home. Over the years, I’ve tested dozens of different setups, and now I’m sharing what actually works for me—whether I’m filming overhead shots for YouTube or styling still photos for my blog. If you’re curious about how I create the content you see here, these posts are a great place to start.

What is in my toolbox?

3 ways camera setup for Tasty-style video recipes

Best camera for cooking videos


Leave a Reply