


How to make enchanting, sea- inspired mermaid cakesicles!

This post contains affiliate links.
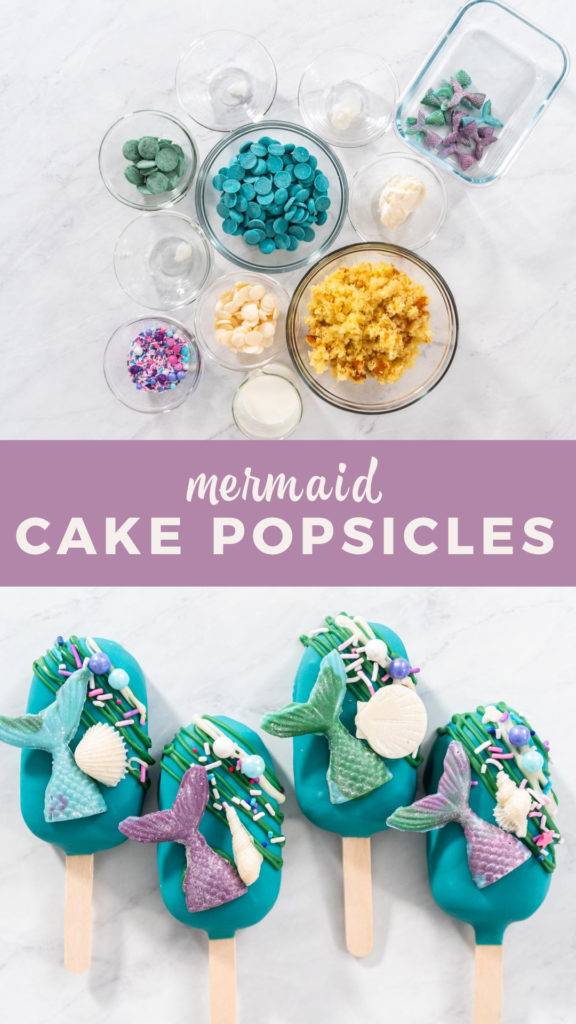
For those of us who love the beach and all things that have to do with the mysterious ocean, we seem to always find ourselves being pulled back to the salty seaside. We can’t explain it, we just know the feeling. We beach fans just can’t get enough of that big, beautiful, blue mystery, especially if you are like me and my daughter who love anything to do with the idea of majestic mermaids being down there! As a creative baker, I like to pull ideas and inspiration from what my family loves and from some of their favorite things. As you may have guessed, my daughter is a huge mermaid fan so I crafted a unique, sea- inspired recipe just for her. I took her love for mermaids and used the idea to create the most gorgeous and enchanting Mermaid Cake Popsicles ever!
These mermaid cake popsicles, commonly known as cakesicles, turned out absolutely stunning! From the yummy cake inside to the gorgeous turquoise candy coating, and the glitter dusted seashells to the chocolate mermaid tails, these cakesicles can only be described as magical and flawlessly fabulous! Now these cakesicles are made similarly to cake pops but on a much larger scale. These are the size of true, full body popsicles. Which makes them a perfect replacement for slices of birthday cake at parties or at playdates, especially since these cakesicles are served on wooden popsicle sticks for easy handling for kids and adults alike. So, if you’ve been looking for a stunning treat to surprise your little beach bum or mermaid fan with, then I’m happy to tell you that your search ends here!

Cakesicle Equipment
This mermaid cakesicle recipe is overall an easy process but it is a bit intricate and does involve many steps and “layers”. If you’re familiar with baking then you might already know that intricate recipes like this usually require several tools and kitchen equipment to accomplish. You may actually have some of these items in your kitchen already, but there are a few other items that you will definitely need to get in order for the process to run smoothly and successfully.
Mermaid Cakesicle Equipment:
- Food brushes
- Mermaid Tail Silicone Mold
- Cake Spatula
- Saucier Drizzle Spoon
- Wood popsicle sticks
- Oval popsicle molds
- Seashell silicone mold
- Candy melt pot
- Small baking sheet
- Piping bags
- Piping bag ties
- Spatulas
- Tall Dipping Container
- Parchment paper sheets

Candy Equipment Tips:
- If you do candy dipping projects like this often, I recommend using these reusable silicone dipping cups instead of paper dipping cups.
I specifically like using Wilton’s candy melt pot over all other melting methods for any kind of candy-making project. This melting pot keeps the chocolate at the perfect temperature through the heating process without ever overcooking the chocolate. Plus it comes with a super easy clean up afterwards.

Beach- Themed Cakesicle Ingredients
The ingredients for these magical mermaid cake pops are surprisingly simple. In this recipe, we will be making a lot of homemade chocolate and chocolate toppings so you will mostly just need a few different colored packs of candy melts, oil, and a few other simple cake ingredients.
Cakesicles
- 2 cups crumbled Yellow cake
- ½ cup Vanilla buttercream frosting -room temperature
- ⅛ cup milk
- 2 cups Wilton Turquoise Candy Melts
- 2 tsp coconut oil
Chocolate seashells
- ¼ cup Bright white Wilton Candy Melts
- ⅛ teaspoon coconut oil
- Glitter Dust
Chocolate mermaid tails
- ½ cup Wilton Turquoise Candy Melts
- ⅛ tsp Coconut oil
- ½ cup Wilton Green Candy Melts
- ⅛ teaspoon Coconut oil
- ½ cup Wilton Lavender Candy Melts
- ⅛ tsp Coconut oil
- Glitter Dust
Garnish
- ¼ cup Wilton Candy Melts Green
- ⅛ teaspoon coconut oil
- Tutu sweet sprinkles
Ingredient Substitution:
You can replace the Wilton chocolate melt method by using 1 cup of white chocolate chips, 1 teaspoon coconut oil, and a little bit of food coloring. Just be careful with the coconut oil because too much oil will make the chocolate too runny.

How to Make Magical Mermaid Cake Pops
Now it’s time to get down to business! As I mentioned above, this mermaid cakesicle recipe does involve quite a few steps and layers so I highly recommend reading through everything before actually beginning the process for this kitchen project. So just relax and read along while I break down the steps for each cake and candy layer. While you’re reading, make sure to keep an eye out for special recipe or instruction notes.
Making the Cakesicles:
- First, measure out all of the cakesicle ingredients.
- Then, combine the crumbled yellow cake and the room temp buttercream frosting in a large mixing bowl. Mix them together with a spatula until the mixture reaches a playdough consistency.
- When the cake mixture is ready, grab some disposable gloves, the wooden popsicle sticks, and the oval popsicle mold.
- Next, scoop the cake mixture into the popsicle molds until each one is ½ way full, making sure to pack it down so the cake is compact.
- Then, insert a wooden popsicle stick into each cake pop.
- Finish filling the popsicle mold with cake to the top, making sure the cake is compact. Pack the cake in and scrape away any excess so that the cakesicles are flat with the mold.
- Then, transfer the cakesicles to the freezer and freeze completely flat for 3 hours. These cake pops have to be solid frozen for the next part of this process.
- When the cakesicles are completely frozen solid, start on the candy coating by first combining the Turquoise Candy Melts and 2 teaspoon coconut oil in the candy melt pot. Continuously stir with a silicone spatula until candies are completely melted.
- Once the candy is melted, immediately transfer it to a tall dipping container and let the chocolate cool down to 100°F.
- Remove the cakesicles from the freezer and the mold right before dipping them into the chocolate.
- Then, dip each cakesicle into the turquoise chocolate and let the excess chocolate drip off. Transfer the coated cakesicles to a parchment paper- lined small baking sheet.
- Finally, refrigerate the candy-coated cakesicles completely flat for 15 minutes.

Making the Chocolate Seashells:
- First, combine the bright white candy melts and the coconut oil in the candy melt pot. Melt them together on high, while stirring continuously with a heat-resistant spatula.
- Then, spoon the melted chocolate into the seashell silicone mold set on small baking sheets. Scrape the excess chocolate off with a cake spatula and tap the trays gently against the counter to remove any air bubbles.
- Next, transfer the trays to the fridge or freezer, making sure to lay the molds completely flat. Let the chocolates sit in the fridge for 15 minutes or in the freezer for 5 minutes.
- After the chocolate has hardened, carefully remove the chocolates from the silicone molds and use a small knife to cut away any extra chocolate from the edges.
- Try not to handle the homemade candies too much as the body heat from your hands can make the chocolate melt.
- Lastly, use a food brush to brush the homemade chocolates with the Glitter Dust.

Making the Chocolate Mermaid Tails:
- First, gather up all the necessary equipment and measure out all of your mermaid tail ingredients.
- Next, get the candy melt pots ready, making sure to line one of the melting pots with a two-compartment silicone liner. Drop the colored candies into the separated sections and add in the coconut oil to each one.
- While the candies and oil are melting together, make sure to stir each section frequently with a heat-resistant spatula until the candies have melted completely.
- Then, set the mermaid tail silicone mold on a baking sheet to keep it flat. Use a saucier drizzle spoon to carefully transfer the melted candy into the mermaid tail molds. Tap the molds gently to remove any air bubbles.
- I like to mix the colors in the mermaid tails to give them a much more whimsical look.
- Next, scrape off the excess melted candy using a cake spatula and then transfer the whole baking sheet either to the fridge or the freezer and sit the tray completely flat. Let the mermaid tails sit in the freezer for 5 minutes or for 15 minutes in the fridge.
- When the chocolates have hardened completely, carefully pull the edges of the silicone mold to gently separate from the mermaid tail candies, then carefully pop the candies out from the molds.
- Remember, try not to handle the chocolate tails too much, your body heat can make the chocolates start to melt.
- Then, carefully cut away any excess candy from the edges and move the candies to a cookie sheet or flat silicone mat.
- Finally, use the food brushes to apply the glitter dust to each of the mermaid tails.
- Store candies in an airtight and rigid container.
- Read below to find out how long you can store these homemade candies.

Assembling the Mermaid Cakesicles:
- First, combine the green candy melts and the coconut oil in the candy melt pot. Melt them together while stirring continuously with a heat-resistant spatula. Once completely melted, transfer the green chocolate to a pastry piping bag and tie it off with a bag tie.
- Then, transfer some of the buttercream frosting to the candy melt pot, after it’s been rinsed and dried, and heat to a drizzling consistency while stirring. Then, transfer the glaze to another piping bag and tie it off with a bag tie.
- Next, I like to separate my sprinkles into separate bowls by size: small, medium, and large.
- This makes it easier to apply them and customize the undersea aesthetic I’m trying to portray.
- After removing the candy-coated cakesicles from the fridge, drizzle them with the green chocolate and the glaze, and immediately decorate with the sprinkles before the candy has a chance to harden.
- Next, squeeze a small amount of chocolate on the back of each of the mermaid tails and immediately stick them to the top of the cakesicles. Repeat this process with the chocolate seashells.
- These fully assembled mermaid cake popsicles can be stored in a rigid, airtight container.
- Keep reading to find out how long you can store these mermaid cakesicles.
Cake Pop and Homemade Chocolate Storage
This recipe has a lot of different homemade components to it, so it can be easy to make more than what you need of, well, any of these treats. So to give you a little helping hand, I’m breaking down the steps on how to store each of these treats properly.
Storing pre-prepared and unfinished cakesicles:
This particular recipe makes 8 mermaid cakesicles but if you want to make enough for a large crowd or you want to have some made ahead of time for future celebrations, you can absolutely do that!
- One full box of cake mix makes 24 cakesicles.
- You can go ahead and make them all, but do not candy- coat the cakesicles that will be stored.
- Keep unfinished/ uncoated cakesicles in the freezer for up to 3 months.
Storing homemade chocolate seashells:
- Just transfer the chocolate seashells to an airtight container and store either in the fridge for 2 weeks or in the freezer for up to 3 months.
- You can use small cuts of parchment paper or wax paper in between the layers to help keep the chocolates separated and intact.
- Always mark the date on the outside of the container to keep up with freshness.
Storing leftover store-bought buttercream frosting:
- Leftover frosting that remains in the opened, store-bought container can be safely stored in the fridge for up to 1 year.
- Always mark the date of opening on the top of the lid.
- I like to mark mine with a black sharpie.
Mermaid Theme
- DIY Mermaid Pumpkins with Glitter, Shells, and No-Carve Magic
- How to Make Mermaid-Themed Chocolate Covered Pretzels
- Mermaid Pretzel Rods for Magical Under-the-Sea Parties
- 3-Layer Mermaid Cake with Pastel Colors in Under 1 Hour
- Vanilla Mermaid Cupcakes – Magical Ocean-Inspired Cupcakes for Birthdays and Special Celebrations
- How to Make Mermaid Tails with Chocolate and Candy Molds


How to store chocolate mermaid tails:
Transfer the chocolate mermaid tails to a rigid, airtight container and store either in the fridge for up to 1 week or in the freezer for up to 3 months. Use small cuts of parchment paper or wax paper in between the layers to help keep the chocolates separated and intact. Always mark the date on the outside of the container to keep up with freshness.
How to store candy-coated mermaid cakesicles:
Transfer the mermaid cake pops to a rigid, airtight container and store either in the fridge for up to 1 week or in the freezer for up to 3 months. I highly recommend using cuts of parchment paper or wax paper in between the layers to help keep the cakesicles separated and intact. Always mark the date on the outside of the container to keep up with freshness and quality.


Serving Up Magical Treats
These majestic mermaid cakesicles are absolutely perfect for making a stunning appearance at birthday parties but obviously, they can be made for any kind of beach or mermaid-themed party or celebration. To make a totally enchanting and majestic food table I recommend serving these mermaid cakesicles with some of my other magically inspired recipes, such as:
- Mermaid Pretzel Rods
- Chocolate Mermaid Tails
- Mini Mermaid Chocolate Bars
- Unicorn Cake
- Unicorn Chocolate Chip Cookies
- Unicorn Meringue Pops
- Unicorn Meringue Cookies
- Unicorn Rainbow Cupcakes
Mermaid Cakesicles are perfect for making a stunning appearance at:
- Kids birthday parties
- Any beach or mermaid-themed birthday party
- Pool parties
- Beach parties/ beach day
- Beach themed weddings or receptions
- Baby showers
- Summer cookouts


Mermaid cake popsicles
Video
Equipment
Ingredients
Cakesicles
- 2 cups crumbled cake Yellow cake
- ½ cup Vanilla buttercream frosting room temperature
- ⅛ cup milk
- 2 cups Wilton Turquoise Candy Melts Wilton Candy Melts Blue
- 2 teaspoon coconut oil
Chocolate seashells
- ¼ cup Bright white Wilton Candy Melts
- ⅛ teaspoon coconut oil
- Glitter Dust
Chocolate mermaid tails
- ½ cup Wilton Turquoise Candy Melts Wilton Candy Melts Blue
- ⅛ teaspoon Coconut OilCoconut oil
- ½ cup Wilton Green Candy Melts
- ⅛ teaspoon Coconut OilCoconut oil
- ½ cup Wilton Lavender Candy Melts
- ⅛ teaspoon Coconut OilCoconut oil
- Glitter Dust
Garnish
- ¼ cup Wilton Candy Melts Green
- ⅛ teaspoon coconut oil
- Tutu sweet sprinkles
Instructions
Cakesicles
- First, measure out all of the cakesicle ingredients.
- Then, combine the crumbled yellow cake and the room temp buttercream frosting in a large mixing bowl. Mix them together with a spatula until the mixture reaches a playdough consistency.
- When the cake mixture is ready, grab some disposable gloves, the wooden popsicle sticks, and the oval popsicle mold.
- Next, scoop the cake mixture into the popsicle molds until each one is ½ way full, making sure to pack it down so the cake is compact.
- Then, insert a wooden popsicle stick into each cake pop.
- Finish filling the popsicle mold with cake to the top, making sure the cake is compact. Pack the cake in and scrape away any excess so that the cakesicles are flat with the mold.
- Then, transfer the cakesicles to the freezer and freeze completely flat for 3 hours. These cake pops have to be solid frozen for the next part of this process.
- When the cakesicles are completely frozen solid, start on the candy coating by first combining the Turquoise Candy Melts and 2 teaspoon coconut oil in the candy melt pot. Continuously stir with a silicone spatula until candies are completely melted.
- Once the candy is melted, immediately transfer it to a tall dipping container and let the chocolate cool down to 100°F.
- Remove the cakesicles from the freezer and the mold right before dipping them into the chocolate.
- Then, dip each cakesicle into the turquoise chocolate and let the excess chocolate drip off. Transfer the coated cakesicles to a parchment paper-lined small baking sheet.
- Finally, refrigerate the candy-coated cakesicles completely flat for 15 minutes.


Chocolate seashells
- First, combine the bright white candy melts and the coconut oil in the candy melt pot. Melt them together on high, while stirring continuously with a heat-resistant spatula.
- Then, spoon the melted chocolate into the seashell silicone mold set on small baking sheets. Scrape the excess chocolate off with a cake spatula and tap the trays gently against the counter to remove any air bubbles.
- Next, transfer the trays to the fridge or freezer, making sure to lay the molds completely flat. Let the chocolates sit in the fridge for 15 minutes or in the freezer for 5 minutes.
- After the chocolate has hardened, carefully remove the chocolates from the silicone molds and use a small knife to cut away any extra chocolate from the edges.Try not to handle the homemade candies too much as the body heat from your hands can make the chocolate melt.
- Lastly, use a food brush to brush the homemade chocolates with the Glitter Dust.


Chocolate mermaid tails
- First, gather up all the necessary equipment and measure out all of your mermaid tail ingredients.
- Next, get the candy melt pots ready, making sure to line one of the melting pots with a two-compartment silicone liner. Drop the colored candies into the separated sections and add in the coconut oil to each one.
- While the candies and oil are melting together, make sure to stir each section frequently with a heat-resistant spatula until the candies have melted completely.
- Then, set the mermaid tail silicone mold on a baking sheet to keep it flat. Use a saucier drizzle spoon to carefully transfer the melted candy into the mermaid tail molds. Tap the molds gently to remove any air bubbles.I like to mix the colors in the mermaid tails to give them a much more whimsical look.
- Next, scrape off the excess melted candy using a cake spatula and then transfer the whole baking sheet either to the fridge or the freezer and sit the tray completely flat. Let the mermaid tails sit in the freezer for 5 minutes or for 15 minutes in the fridge.
- When the chocolates have hardened completely, carefully pull the edges of the silicone mold to gently separate from the mermaid tail candies, then carefully pop the candies out from the molds.Remember, try not to handle the chocolate tails too much, your body heat can make the chocolates start to melt.
- Then, carefully cut away any excess candy from the edges and move the candies to a cookie sheet or flat silicone mat
- Finally, use the food brushes to apply the glitter dust to each of the mermaid tails.
- Store candies in an airtight and rigid container.Read below to find out how long you can store these homemade candies.


Cakesicles assembley
- First, combine the green candy melts and the coconut oil in the candy melt pot. Melt them together while stirring continuously with a heat-resistant spatula. Once completely melted, transfer the green chocolate to a pastry piping bag and tie it off with a bag tie.
- Then, transfer some of the buttercream frosting to the candy melt pot, after it’s been rinsed and dried, and heat to a drizzling consistency while stirring. Then, transfer the glaze to another piping bag and tie it off with a bag tie.
- Next, I like to separate my sprinkles into separate bowls by size: small, medium, and large.This makes it easier to apply them and customize the undersea aesthetic I’m trying to portray.
- After removing the candy-coated cakesicles from the fridge, drizzle them with the green chocolate and the glaze, and immediately decorate with the sprinkles before the candy has a chance to harden.
- Next, squeeze a small amount of chocolate on the back of each of the mermaid tails and immediately stick them to the top of the cakesicles. Repeat this process with the chocolate seashells.
- These fully assembled mermaid cake popsicles can be stored in a rigid, airtight container.Keep reading to find out how long you can store these mermaid cakesicles.


Notes
- If you do candy dipping projects like this often, I recommend using these reusable silicone dipping cups instead of paper dipping cups.
Nutrition
Food Photography & Video Tips from My Studio
Here’s a peek at the tools, gear, and camera setups I use to film my recipe videos and photograph food at home. Over the years, I’ve tested dozens of different setups, and now I’m sharing what actually works for me—whether I’m filming overhead shots for YouTube or styling still photos for my blog. If you’re curious about how I create the content you see here, these posts are a great place to start.


Leave a Reply