


|

This post contains affiliate links.
Why You’ll Love This Recipe
There is something magical about combining rich chocolate with the warm, spicy kick of classic gingerbread. These Chocolate Gingerbread Cookies have become one of my favorite treats to make during the holiday season. The subtle bitterness of cocoa powder balances perfectly with the sweet molasses and warm spices. The result? Soft, chewy, chocolatey cookies that still hold their shape when baked and taste even better the next day.
Every year when I start baking gingerbread, I find myself reaching for cocoa powder just to see how it transforms the dough. This version has a deeper flavor and makes a perfect base for holiday shapes. They’re not too sweet and pair wonderfully with a simple Cranberry Buttercream or a dusting of Cinnamon Sugar.
If you love holiday baking as much as I do, you’ll want to check out my other seasonal cookies like Amber Gingerbread Cookies, Pale Gingerbread Cookies, and even my guide on How to Cut Fudge into Smooth Perfect Pieces for festive gifts.
Watch how I make this recipe
What Makes These Cookies a Favorite
- The bittersweet cocoa perfectly complements the warm holiday spices
- Dough is easy to roll, cut, and re-roll with minimal cracking
- Bakes into soft, chewy cookies that hold their shape
- Great for decorating, gifting, or sandwiching with buttercream
- They become more flavorful the next day—perfect make-ahead cookies
- Chocolate adds richness and depth to traditional gingerbread
- Dough is easy to work with and holds shape beautifully
- Cookies stay soft but sturdy enough for packaging and gifting
- Great base for decorating with icing, sugar, or pairing with frostings

Tools That Make It Easier
Each tool I use here makes the process easier, cleaner, or more consistent:
- Measuring Cup & Measuring Spoons — essential for accurately measuring dry and wet ingredients
- Glass Mixing Bowl — perfect for whisking and prepping ingredients ahead
- Kitchen mixer — for creaming butter and sugar into a fluffy, even base
- Silicone Spatulas — great for scraping every bit of dough and folding in ingredients
- Food Wrap — keeps dough fresh and firm while chilling
- Adjustable rolling pin — ensures even dough thickness for consistent cookies
- Christmas cookie cutters — gives the cookies that fun, festive look
- Cake spatula — helps lift cutouts without breaking their shape
- Parchment paper sheets — prevents sticking and makes cleanup a breeze
- Baking sheet — the foundation for evenly baked cookies
- Cooling rack — allows cookies to cool properly without getting soggy
- Dredge shaker — for lightly flouring surfaces without clumping
These tools don’t just make this recipe easier—they’re ones I reach for in many of my holiday baking projects like Spiced Gingerbread Dough and Orange Zest Gingerbread Dough.

What You’ll Need From Your Pantry
- 3 cups All-Purpose Flour
- ¼ cup unsweetened cocoa powder
- ¾ teaspoon Baking Soda
- ½ teaspoon Salt
- 1 teaspoon Ground Cinnamon
- 1 teaspoon Ground Ginger
- ¾ teaspoon Ground Cloves
- ½ teaspoon Ground Nutmeg
- 1 Large Egg
- 1 teaspoon Vanilla Extract
- ½ cup Molasses
- ¾ cup Unsalted Butter (room temperature)
- ½ cup Brown Sugar (packed)

Before You Start: My Quick Tip
- Chill the dough for at least an hour. It makes rolling and cutting easier and keeps the cookies from spreading.
- Use an adjustable rolling pin to maintain even thickness.
- Let the cookies cool completely before decorating or packing them.
- If baking more than one gingerbread flavor, assign a unique shape to each batch so you can tell them apart.
- These cookies taste even better after resting a day in an airtight container.

Latest Video
Let’s Make It Together
- Measure and prepare all ingredients before starting to ensure a smooth process.
- In a large mixing bowl, whisk together flour, cocoa powder, baking soda, salt, cinnamon, ginger, cloves, and nutmeg. Set aside.
- In a separate bowl, whisk the egg, molasses, and vanilla extract until well combined.
- In a kitchen mixer, cream butter and brown sugar on medium speed for 2-3 minutes until light and fluffy.
- Scrape the sides of the bowl and add the molasses mixture. Mix until smooth.
- Gradually add dry ingredients in thirds, mixing on low after each addition. Mix until a smooth, slightly firm dough forms.
- Divide dough into two disks, wrap in food wrap, and refrigerate for at least 1 hour.
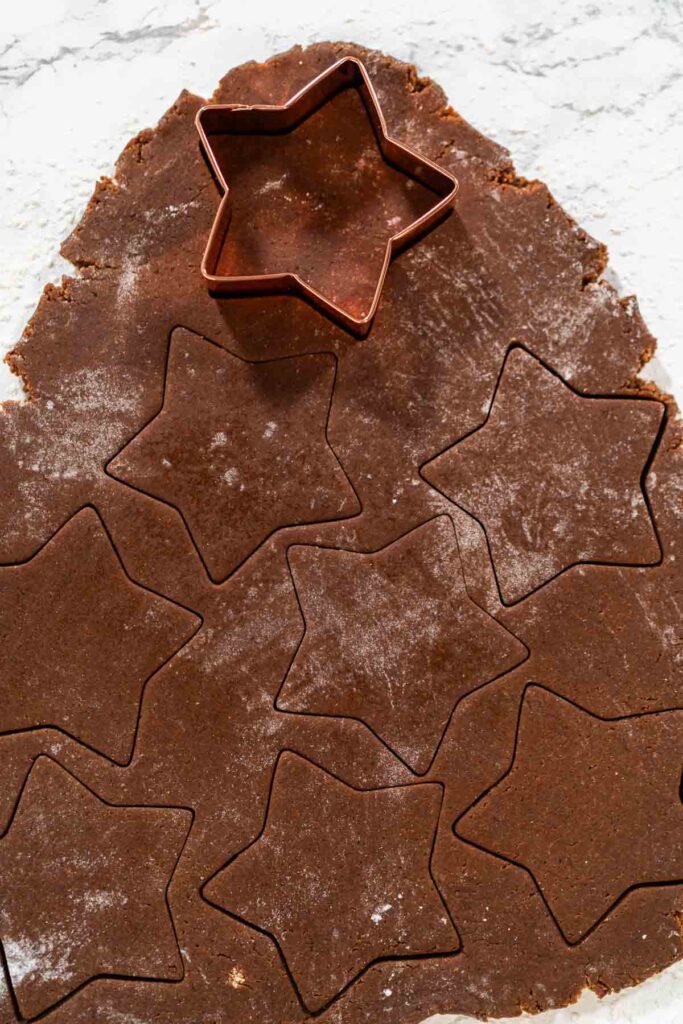
- Preheat oven to 350°F (175°C). Line baking sheets with parchment paper. Roll chilled dough to ¼-inch thickness. Cut out shapes using cookie cutters.
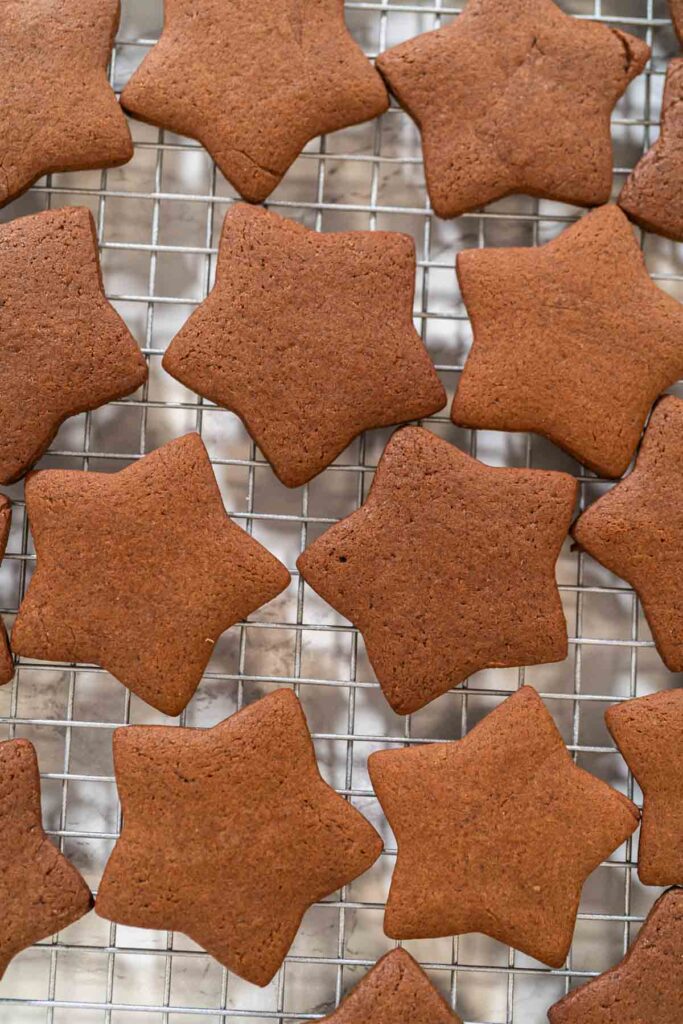
- Chill cutouts for 10 minutes before baking to help them hold shape. Bake for 8-10 minutes until edges are set. Cool on tray for 5 minutes, then move to a cooling rack.
- Repeat rolling, cutting, chilling, and baking with remaining dough.

Recipe variations
- Add mini chocolate chips to the dough for extra richness
- Swap molasses for maple syrup for a lighter flavor
- Add orange zest to the dough to complement the cocoa and spices
- Use white chocolate drizzle for contrast in color and taste

Serving Ideas
- Pair with hot cocoa or coffee for a cozy winter treat
- Serve with Cranberry Buttercream sandwiched between two cookies
- Add a sprinkle of Cinnamon Sugar right after baking
- Use as edible gift tags for wrapped presents (just poke a small hole before baking!)

Troubleshooting Common Issues with Cutout Cookie Dough
Even with the best recipes and careful preparation, sometimes things don’t go as planned in the kitchen. But don’t worry! I’ve encountered plenty of baking hiccups, and I’m here to share some tips to help you troubleshoot common issues with cutout cookie dough.
Dough Too Sticky
If your dough feels sticky and hard to handle, it might need a little extra flour. This can happen due to slight measurement variations or even humidity in the kitchen. Start by adding one tablespoon of all-purpose flour at a time, gently kneading it into the dough until it’s firm but still pliable. Be careful not to add too much flour, as it can make the cookies dry.
Dough Cracking While Rolling
Sometimes chilled dough can feel a bit too stiff and crack when rolled out. If this happens, let the dough sit at room temperature for 10-15 minutes to soften slightly. The high butter content in the dough makes it firm when cold, but letting it warm up a bit will make rolling much easier.
Cookies Spreading During Baking
If your cookies lose their shape in the oven, it’s often due to insufficient chilling. After cutting out your cookies, place them back in the fridge or freezer for 10-15 minutes before baking. This step helps the dough hold its shape and prevents spreading.
Another trick is to add a teaspoon of cornstarch to the dry ingredients. Cornstarch reduces spreading during baking and keeps the cookies nice and sturdy for decorating.
Uneven Baking
Uneven baking can happen if the cookies are different sizes or if multiple trays are stacked in the oven. To avoid this, make sure your cutout cookies are all the same thickness and bake one tray at a time on the middle rack. This ensures even heat distribution and perfectly baked cookies every time.
Overbaked or Burnt Edges
If your cookies are coming out with dark edges, they may have baked too long. Keep an eye on them as they bake—most cookies are done when the edges are set but the centers still look slightly soft. Start checking a minute or two before the recommended baking time to ensure they don’t overbake.
Dough Too Soft to Cut
If the dough is too soft when you’re cutting out shapes, it likely hasn’t chilled long enough. Pop it back in the fridge for another 20-30 minutes to firm up before trying again. Patience is key for perfectly shaped cookies!
Personal Tip
Don’t get discouraged if things don’t go perfectly the first time. Baking is as much about learning as it is about enjoying the process. I’ve had my share of “oops” moments, but each one taught me something new. And honestly, even the imperfect cookies still taste amazing!
Troubleshooting is just part of the fun when baking, and with a little patience and these tips, you’ll have beautiful, delicious cut-out cookies ready to share. Let’s move on to the best part—enjoying these delightful creations!

Preserving Cutout Cookie Dough: Storage and Freezing Tips
Proper storage and freezing are key to preserving the quality of cutout cookie dough, ensuring it’s just as good when you’re ready to bake as it was when you first made it. Whether you’re chilling dough for a short period or freezing it for future use, these methods are essential for maintaining flavor and texture. This section provides practical tips and techniques to help you efficiently store and extend the life of your cookie dough.
Storing Dough in the Refrigerator
If you’re planning to bake within the next few days, store the dough in the refrigerator. After dividing the dough into two portions, wrap each one tightly in plastic wrap and place it in the fridge. Chilling the dough for at least an hour firms it up, making it easier to roll and cut into shapes. You can store the dough in the refrigerator for up to three days.
Freezing Dough for Longer Storage
For longer storage, freezing the dough is a fantastic option. Here’s how I do it:
1. Wrap each dough disk in an extra layer of plastic wrap or aluminum foil to protect it from freezer burn.
2. Place the wrapped disks into a freezer-safe zip-top bag for extra protection.
3. Label the bag with the date and the name of the dough using a Sharpie. This avoids any confusion when you’re digging through the freezer later!
The dough will keep beautifully in the freezer for up to three months.
Thawing Dough for Use
When you’re ready to bake, simply transfer the dough from the freezer to the refrigerator and let it thaw overnight. By the next day, it will be chilled and ready to roll. If the dough feels too firm after thawing, let it sit on the counter for 10-15 minutes to soften slightly before rolling.
Freezing Baked Cookies
If you’re planning to bake ahead of time, you can also freeze the baked cookies. Once the cookies have cooled completely, layer them between sheets of parchment paper in a freezer-safe container. This prevents them from sticking together. Just like the dough, label the container with the date and flavor so you can stay organized.
When you’re ready to serve or decorate, let the cookies thaw at room temperature for about 30 minutes.
Staying Organized During Holiday Baking
My holiday baking season gets busy fast, so freezing dough and baked cookies is my secret weapon. I usually start making my dough in September, bake in October or November, and decorate in December. This timeline helps me stay ahead of the holiday rush while still having plenty of fresh, delicious cookies to share.
With these storage tips, you can make your holiday baking stress-free and enjoy the process just as much as the results!
Decorating Cutout Cookies: Techniques and Tips
Once my cutout cookies are baked and cooled, it’s time for my favorite part—decorating! This is where I can transform these tasty cookies into beautiful treats for any occasion. Whether I’m using royal icing, chocolate icing, or dipping them in chocolate, decorating is where creativity and tradition converge in my kitchen.
Getting Ready to Decorate
First, I always make sure my cookies are completely cooled before decorating. Trying to decorate warm cookies is a recipe for disaster—melting icing and smudged designs are no fun. Let them cool completely for the best results.
I like to set up my decorating area with everything I need organized and ready:
• Royal icing in piping bags with fine tips for detailed designs.
• Chocolate icing in piping bags, used just like royal icing for piping intricate patterns or designs.
• Dipped in chocolate for adding a glossy finish to cookies.
• Sprinkles, crushed nuts, or crushed peppermint candy canes for decorating dipped cookies.
• Edible markers for writing or drawing directly on the cookies.
I also line my workspace with parchment paper, which keeps cookies from sticking and makes cleanup easy.
Decorating with Royal Icing
Royal icing is my go-to for that smooth, polished cookie look. I start by outlining the cookie with a thicker consistency icing, then flood the center with a thinner icing. A toothpick is perfect for spreading the icing evenly and popping any air bubbles.
If I’m layering colors or adding details, patience is key! A light design or piping dries in about 24 hours, but fully flooded cookies can take up to 48 hours to dry completely. For a detailed guide on working with royal icing, check out my blog post How to Flood Cookies with Royal Icing. It’s packed with tips and tricks to make your cookies look professionally decorated!
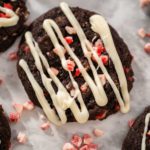
Decorating with Chocolate Icing
Chocolate icing works similarly to royal icing—it’s piped on top of the cookies using a piping bag. It’s great for adding intricate patterns or creating fun, festive designs. You can use dark chocolate, milk chocolate, or white chocolate, depending on the look and flavor you’re going for.
Unlike dipped chocolate, chocolate icing dries with a slightly glossy finish and is ready to handle in about 30 minutes to an hour, depending on the thickness of the design. I go into more detail about working with chocolate icing in my blog post Chocolate Cookie Decorating Tips, so be sure to check it out for inspiration!
Dipped in Chocolate
Another fun and simple method is dipping cookies in melted chocolate. I dip half of the cookie into the chocolate for a two-tone effect, which looks both elegant and festive.
While the chocolate is still wet, I sprinkle the dipped side with holiday sprinkles, crushed nuts, or crushed peppermint candy canes. This method adds texture, color, and a burst of flavor to every bite. Unlike piped chocolate icing, dipped chocolate works as a base for these fun toppings. If you’re curious about how to achieve the perfect dipped cookie, check out my blog post How to Decorate Cookies with Melted Chocolate for a step-by-step guide.
Dipped cookies dry much faster than royal icing—typically within 30 minutes to an hour, depending on how thick the chocolate layer is.
Storing Decorated Cookies
Once decorated, I let the cookies dry completely before stacking or packaging. For royal icing, I allow up to 48 hours for flooded cookies to set, while chocolate icing or dipped cookies are usually ready in about an hour.
For gifting, I individually wrap each cookie in self-sealing plastic bags. This keeps them fresh, prevents decorations from smudging, and makes them look beautifully presentable.

Chocolate Gingerbread Cookies
Video
Equipment
Ingredients
- 3 cups All-Purpose Flour
- ¼ cup unsweetened cocoa powder
- ¾ teaspoon Baking Soda
- ½ teaspoon Salt
- 1 teaspoon Ground Cinnamon
- 1 teaspoon Ground Ginger
- ¾ teaspoon Ground Cloves
- ½ teaspoon Ground Nutmeg
- 1 Large Egg
- 1 teaspoon Vanilla Extract
- ½ cup Molasses
- ¾ cup Unsalted Butter at room temperature
- ½ cup Brown Sugar packed
Instructions
Chocolate Gingerbread Cookie Dough
- Measure and prepare all of your ingredients before starting to ensure a smooth process.
- In a large mixing bowl, combine the flour, cocoa powder, cinnamon, ginger, baking soda, cloves, nutmeg, and salt. Whisk the dry ingredients until fully combined and set aside.
- In a separate bowl, whisk together the egg, molasses, and vanilla extract until smooth and well blended.
- In the bowl of your kitchen mixer, add the room-temperature unsalted butter and packed brown sugar. Using the paddle attachment, cream them together on medium speed for about 2-3 minutes, until the mixture is light and fluffy.
- Scrape the butter mixture from the sides of the bowl using a silicone spatula, then add the egg and molasses mixture. Mix on medium speed until fully combined.
- Gradually add the dry ingredients to the wet mixture, about ⅓ at a time, mixing on low speed after each addition.
- Continue mixing until a smooth, slightly firm dough forms. The dough should hold together but not be sticky.
- Divide the dough into two equal portions, flatten them into disks, and wrap in plastic wrap. Place the dough in the refrigerator to chill for at least 1 hour. This helps firm the dough, making it easier to roll and cut.


Baking Cookies
- While the dough chills, preheat your oven to 350°F (175°C). Line your baking sheets with parchment paper to prevent sticking.
- After chilling, remove one disk from the refrigerator. Lightly flour your work surface and rolling pin. Roll the dough out to about ¼-inch thickness, using the adjustable rolling pin for even consistency. If the dough starts to crack or get too soft, chill it again briefly.
- Use your Christmas cookie cutters (or any preferred shape) to cut out cookies from the rolled dough. Carefully transfer the cut-out shapes onto the prepared baking sheet, leaving about 1 inch of space between each cookie.
- Before baking, place the cut-out cookies in the refrigerator for an additional 10 minutes to help them hold their shape while baking.
- Place the baking sheet in the preheated oven and bake the cookies for 8-10 minutes. The edges should be firm but the center slightly soft, as the cookies will continue to firm up while cooling.
- Once baked, remove the cookies from the oven and let them cool on the baking sheet for about 5 minutes. Afterward, transfer them to a cooling rack to cool completely.
- Repeat the rolling, cutting, and baking steps with the remaining dough.


Nutrition
From My Kitchen to Yours
Gingerbread Recipes
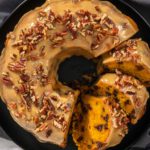
- Moist Gingerbread Bundt Cake with Warm Caramel Hidden Inside
- Gingerbread Man Chocolates for Garnishing Cookies, Cupcakes, and Cakes
- Festive Holiday Cupcakes with Classic Gingerbread Flavor
- How to Make Amber Gingerbread Cookie Dough (No Molasses Needed)
- Warmly Spiced Gingerbread Cookies for Christmas
- How to Make Classic Gingerbread Cookies from Scratch


Pin It For Later

Food Photography & Video Tips from My Studio
Here’s a peek at the tools, gear, and camera setups I use to film my recipe videos and photograph food at home. Over the years, I’ve tested dozens of different setups, and now I’m sharing what actually works for me—whether I’m filming overhead shots for YouTube or styling still photos for my blog. If you’re curious about how I create the content you see here, these posts are a great place to start.


Leave a Reply