How to make food videos with an overhead camera for YouTube and Instagram
This post contains affiliate links.
Over the past few years, video recipes, such as videos made for Tasty, have been popping up all over social media showcasing hundreds of meal prep videos. As a well-seasoned food photographer, I’ve been using overhead cameras for a while now, but it was quite a process to achieve the perfect overhead camera system for the spaces that I move to, and maybe this blog will help those who are struggling with achieving the perfect overhead camera mount.
Mounting and shooting an overhead video shot is quite challenging and confusing and over the course of a few years, as I moved studios, I have tried a variety of ways of mounting overhead cameras. These three different ways will work for some, but not for others, depending on time, budget, space, and one’s ability to operate their equipment appropriately.
Tethering cable camera support
Technique #1: Overhead tripod mount
My first attempts at achieving an overhead shot were through the most obvious and cost-effective means, and that is using a a special angled arm mount. The mount is at 90 degrees so that the camera faces down. Placing the tripod on the floor will work as a steady enough platform, but real issues will arise when you need to move around your shooting area, as a wide area will need to be cleared for your tripod and your mobility will be restricted. The tripod will also create additional shadows, so your camerawork will have to be extra crafty to avoid ruining lighting in shots. I have attempted to circumvent these issues by placing the tripod on the platform that I’m shooting, which allows for me to move around a bit more, but creates some other issues, such as the table moving whenever I touched anything on it, and thus shaking the camera.
Technique #2: C-Stand
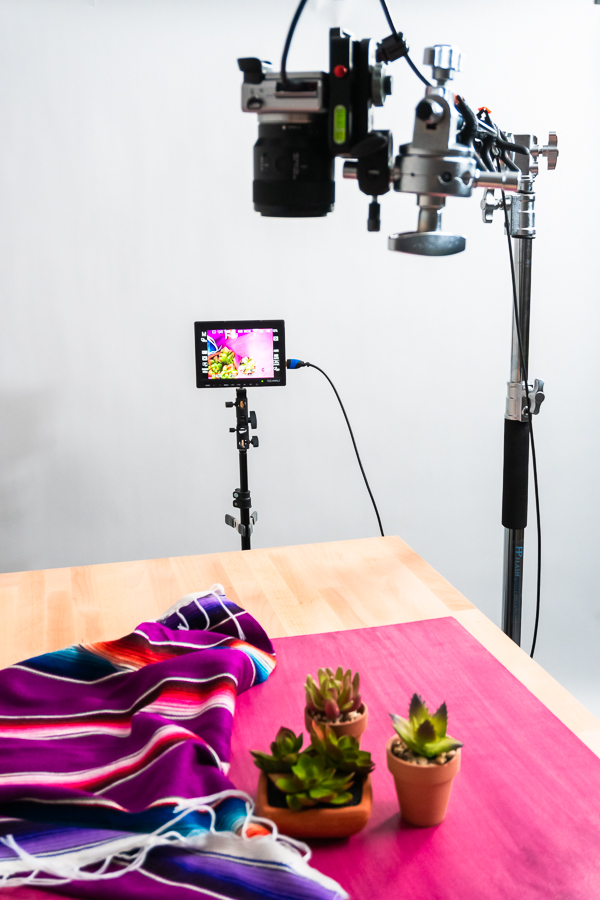
After trying out the most cost-effective way to achieve overhead shots, I soon realized that it would be worth it to invest some money in better equipment. I bought a C-Stand, which allowed me to get perfect overhead shots with mobility around the shooting area. However, I wasn’t able to see any of the shots I was making, as the camera was mounted above my head or out of reach. I remedied this by using an external monitor that plugged into the camera, and I could see my shots perfectly. Paired with an external camera remote, I was able to shoot a bit further from the camera without fiddling around too much with my camera. I ran with this setup for a while, and I discovered an issue involving using lenses while the camera is mounted. Even as I weighed down the C-Stand with sandbags, using the camera with too large of a lens would risk toppling over, which I was lucky enough to never experience. Despite this, I was happy with the C-Stand, until the issues that I experienced with my old setup came back to affect my videos.
Adapter clamp with quick release
Tethering cable camera support
The Importance of Solid Ground
When shooting video, it is extremely important that your videos are as stable as possible. When placing the tripod on the table, even touching foods or attempting to move anything around on the surface will slightly shake the tripod and camera, rendering all video useless. This issue arises n any videography situation, depending on the platform your equipment is placed on. Usually, this works just fine with photography but is detrimental to videos. For example, in my old studio. The floor was solid concrete on the ground floor, which usually seemed stable enough until trains would pass through on the train tracks 1,000 feet away from my studio. This made the area highly unreliable for videography work, so it is important to always ensure a stable platform if you’re shooting video.
Technique 3: Complete Overhead Mount
After moving studios to my most recent location, I was once again able to update my overhead mounting system. I couldn't install my old system here, as the floor is raised plywood floors, which would cause too much vibration on my camera to reliably take videos. I tested this out by placing a bowl of water on my work area with an object to float on top, and I would walk around, noting how much the object moved around when walking. Since my new work area had exposed ceilings, I used this to my advantage. I used a super clamp and friction arm to mount my camera directly to the rafters in the ceiling, making for an extremely stable mount, without any tripods to take up space around my work area. This setup grants me the most amount of mobility and freedom with my overhead shots, and I couldn’t be happier with this setup. Once again, I use an external monitor and remote to have full control of my camera, even as it’s mounted outside of comfortable reach. This setup is mostly for those who have reached a permanent shooting area, as the other setups are easily collapsible.
Adapter clamp with quick release
Tethering cable camera support
Stands and mounts
Magic Friction Arm Super Crab Clamp
Manfrotto 3 Section Double Articulated Arm with Camera Bracket
Manfrotto Replacement Camera Bracket for Magic Arm
C-Stand, Adjustable Reflector Stand with 4ft/120cm Holding Arm and 2 Pieces Grip Head
PHOCUS 8.8ft Compact Aluminum Light Stands
External monitors and cables
Feelworld FW759 Screen Camera Field Monitor 1280x800 IPS Screen (7 Inch)
Neewer 11"/28cm Adjustable Friction Power Articulating Magic Arm
Sony DLC-HE20S Slim High speed HDMI Cable, 2 m (6.56-Feet)
Jerkstopper Tether Tools Tethering Camera Support
Table
Food Photography & Video Tips from My Studio
Here’s a peek at the tools, gear, and camera setups I use to film my recipe videos and photograph food at home. Over the years, I’ve tested dozens of different setups, and now I’m sharing what actually works for me—whether I’m filming overhead shots for YouTube or styling still photos for my blog. If you’re curious about how I create the content you see here, these posts are a great place to start.


Leave a Reply