


|
This post contains affiliate links.
There’s something so satisfying about growing fresh food right in your kitchen—especially when it takes almost no effort! Between busy photo shoots, editing marathons, and family life, I rarely have time to tend to a full garden. But growing sprouts in a jar has become my little green therapy. It’s quick, fun, and surprisingly rewarding to see those tiny seeds turn into crunchy, nutrient-packed greens in less than a week. Sophia loves helping me with this—it’s our mini science project that ends with something delicious on the table!
Sprouts are not only loaded with vitamins and minerals, but they also make everything taste fresher. Whether it’s on avocado toast or in a wrap, they add that perfect bit of crunch. Plus, I get a secret joy knowing I grew them myself, right next to the coffee maker. It’s the same kind of simple joy I feel when I bake my Simple Banana Bread with Walnuts or make a batch of Blueberry Muffins with White Ganache—those small moments that fill the kitchen with life. And just like my Classic Borsch, these sprouts remind me that healthy, homemade food doesn’t have to be complicated to be delicious.
Watch how I make this recipe
Why You’ll Love This Recipe
- No garden required: Perfect for small kitchens or apartments — all you need is a jar and a few seeds.
- Quick results: You’ll see sprouts growing in just a couple of days, and they’re ready to eat in less than a week.
- Packed with nutrition: Sprouts are rich in vitamins, minerals, and antioxidants, making every bite a superfood boost.
- Low-maintenance: No soil, no sunlight, no fuss — just rinse, drain, and repeat.
- Fun for kids: Sophia loves checking on our jars each morning; it’s an easy way to teach kids where food comes from.
- Year-round freshness: No matter the season, you can grow greens right on your countertop.
- Visually satisfying: Watching them grow day by day adds a touch of calm to my busy mornings.

Tools That Make It Easier
You don’t need fancy gear to start—just a few simple tools make it easy:
- Sprouting jar lid – lets you rinse and drain without ever opening the jar.
- Sprouting jar stand – keeps jars tilted for drainage and airflow.
- Ball Mason Jar (32 oz) – a wide-mouth jar works best for growing roomy, healthy sprouts.
Arina’s Tip: If you don’t have a sprouting stand, don’t worry! I sometimes lean my jars against a mixing bowl or roll up a kitchen towel to tilt them. Simple fixes work just fine.

What You’ll Need From Your Pantry
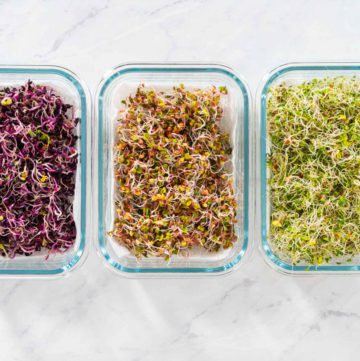
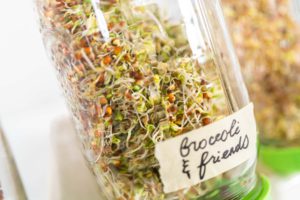
- 2 tbsp Broccoli and Friends Sprouting Seed Mix + 2 cups water
- 2 tbsp Rainbow Radish Sprouting Seeds Mix + 2 cups water
- 2 tbsp Daikon Radish Seeds + 2 cups water
You can use almost any sprouting seed, like alfalfa, mung beans, or clover—just make sure they’re labeled for sproutingand safe for eating raw.

Before You Start: My Quick Tip
- Always use filtered water—I find it helps the sprouts stay crisp and fresh.
- I love mixing different seed types for color and flavor. Broccoli sprouts are my go-to, but radish adds a zesty kick!
- If your kitchen runs cold, wrap the jars loosely with a towel to keep them cozy. It helps them sprout faster.
- And don’t toss the last handful—throw them into your morning smoothie for a hidden veggie boost.

Latest Video

Let’s Make It Together
Day 1
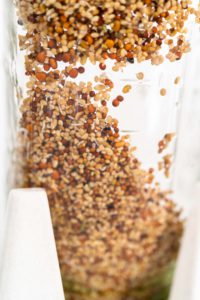
- Gather all your equipment and measure your seeds.
- Add seeds to your Mason jars and pour 2 cups of water over each one.
- Secure the sprouting jar lids and let them soak overnight on the counter.
- Label the jars if you’re growing multiple types—trust me, it’s easy to forget which is which when you’re multitasking with dinner and photo edits!
Day 2
- Drain the water through the lids—no need to remove them.
- Rinse with cool water and drain again.
- Set the jars upside down on your sprouting stand or propped in a bowl.
- Keep them in a cozy, shaded spot away from direct sunlight.
- Rinse and drain 1–2 more times throughout the day. Sophia usually reminds me by asking, “Mom, are the sprouts thirsty again?”
Day 3–5
- Continue rinsing and draining 1–2 times per day.
- Little sprouts will start poking out—such a happy sight!
- Some seeds grow faster than others, so don’t stress if one jar takes its time.
Day 6 – Harvesting
- When sprouts are about an inch long, they’re ready to harvest.
- For greener sprouts, set the jars in sunlight for one day and rotate them to ensure even color.
- Remove the sprouts from the jars and rinse thoroughly.
- I love using my salad spinner—it gets rid of excess water quickly.
- Lay them out on paper towels to dry for about 30 minutes.
- Store the sprouts in an airtight container lined with paper towels and refrigerate.
- Enjoy within 3–5 days—though mine rarely last that long because I add them to everything!

🌿 Seed Variety Comparison Table
| Seed Type | Flavor | Sprouting Time | Best Used For |
|---|---|---|---|
| Broccoli | Mild, earthy | 5–6 days | Sandwiches, wraps |
| Radish | Peppery, spicy | 4–5 days | Salads, avocado toast |
| Alfalfa | Light, grassy | 6–7 days | Smoothies, salads |
| Mung Bean | Crunchy, sweet | 4–6 days | Stir-fries, bowls |

Variations
- Spicy Mix: Add mustard or radish sprouts for a little fire.
- Mild & Sweet: Alfalfa and clover seeds make light, crisp sprouts that pair beautifully with honey-mustard dressing.
- Colorful Blend: Combine broccoli, radish, and mung beans for a rainbow of flavor and texture.
- Microgreens Upgrade: Use a shallow tray to grow larger greens—great for garnishing dishes like my Blueberry Muffins with White Ganache photo setups.

Storage
Storing your sprouts properly keeps them fresh, crisp, and safe to eat. Once they’re fully grown and dried, line an airtight container with paper towels to absorb excess moisture. I like to use a glass container because it lets me easily see how much I have left — and honestly, it just looks pretty in the fridge next to my jars of homemade jam! Keep the sprouts refrigerated and use them within 3 to 5 days for the best flavor and texture. If they start to look wilted or smell off, it’s time to compost them and start a new batch.
Arina’s Tip: Never store wet sprouts. Moisture is the enemy of freshness! Make sure they’re dry before sealing the container.
🧊 Storage Method Table
| Container Type | Storage Time | Tip |
| Glass jar with paper towel | 3–5 days | Replace towel daily if moist |
| Plastic bag with towel insert | 2–3 days | Keep air inside minimal |
| Airtight container | 5–7 days | Store at back of fridge for even temp |

How to Use Sprouts
Once you have a batch of homegrown sprouts, the possibilities are endless! Here are my favorite ways to use them:
- Mixed into smoothies for a nutritious twist.
- On sandwiches or wraps for that satisfying crunch.
- As a topping for soups, especially my Classic Borsch—it adds brightness to the earthy flavor.
- On avocado toast with a drizzle of olive oil and sea salt.
- Tossed into salads for color and freshness.
- Added to a Bagel Brunch Board (perfect for weekend mornings).


Related Recipes from My Blog
If you enjoy this kind of hands-on kitchen project, here are a few more you might love:
- Guide to Using Cast Iron Cookware – if you love kitchen experiments, this guide will become your go-to.
- Classic Borsch – hearty, colorful, and nourishing.
- Simple Banana Bread with Walnuts – the perfect cozy pairing with tea and sprouts on toast.
- White Chocolate Ganache – because balance means greens and dessert!
- Blueberry Muffins with White Ganache – a weekend favorite at our house.
Growing sprouts in a jar has become one of my favorite rituals—it’s soothing, simple, and endlessly rewarding. Every morning when I rinse them, I get a little reminder that small, consistent care can grow something beautiful. And really, isn’t that the perfect metaphor for life—and cooking?

How to Grow Sprouts in a Jar
Ingredients
- 2 tablespoon Broccoli and Friends Sprouting Seed Mix
- 2 cups water
- 2 tablespoon Rainbow Radish Sprouting Seeds Mix
- 2 cups water
- 2 tablespoon Daikon Radish
- 2 cups water
Instructions
Day 1
- First, gather up the equipment and measure out all of the sprouting materials.
- Then, pour the sprouting seeds into your mason jars and cover them with 2 cups of water each. Secure a sprouting jar lid to each jar and let them sit on the counter overnight. Label the jars if growing different varieties.

Day 2
- The next day, drain out the overnight water through the strainer sprouting jar lids. Do not remove the lids at all during the entire rinsing and draining process. You don’t want to accidentally lose any seeds.
- Then, add clean, cold water to the jars and swish it around to rinse the seeds.
- Next, drain out the water through the lids and place the jars propped upside down on the sprouting jar stand. If you do not have a stand, you can prop your jars up carefully against a wall and on a kitchen towel. Just make sure they can get some air flow.Try to place the jars somewhere away from direct sunlight.
- Rinse and drain the sprouts like this 1-2 more times throughout the day.

Day 3
- Repeat the rinsing and draining process using cold water 1- 2 times throughout the day. Remember, do not open the lids! You should start seeing little sprouts starting to pop out on this day! But don’t freak out if you don’t see any yet, different types of sprouts can have different sprouting times.
Day 4
- Repeat the rinsing and draining process using cold water 1- 2 times throughout the day. Remember, do not open the lids! There should be a bit more visible sprouting and more little sproutlings popping out today.
Day 5
- Repeat the rinsing and draining process using cold water 1- 2 times throughout the day. Remember, do not open the lids! Almost there! There should be quite a bit more sprouting visible now!
Day 6 Harvesting
- Once the sprouts reach about an inch, they are ready for harvesting and devouring! If you want your sprouts to be a bit greener in color you can put them in direct sunlight for a day before harvesting. Spin the jar so the sun can reach all the sprouts.
- When ready to harvest, first remove the sprouts from the jars.
- Then, thoroughly rinse and drain the sprouts. I personally prefer to use a salad spinner for rinsing and spinning out all the excess water.
- Next, line a baking sheet with paper towels.
- Transfer the sprouts to the paper towel- lined baking sheet, keeping the varieties separate. Then, let the sprouts dry for about 30 minutes.
- Finally, transfer the sprouts to an airtight container lined with a paper towel.
- These home- grown sprouts should be eaten as soon as possible but can be stored for up to 3 days in the fridge. These can also be stored in a plastic bag or glass container, but always with a paper towel to help absorb any moisture.


From My Kitchen to Yours
Cooking Hacks
- Hard-Boiled Eggs
- How Much Mashed Potatoes to Serve Per Person at Any Meal
- Instant Pot No-Peel Hard Boiled Eggs – The Easiest Method
- How to Boil Eggs with an Egg Timer (Perfect Every Time)
- Simple White Royal Icing – Perfect for Cookie Decorating
- Classic Sugar Cookie Dough for Cutout Cookies – No Spread Recipe


I’ve Got Answers
Can I use garden seeds instead of sprouting seeds?
No—only use seeds labeled for sprouting. Garden seeds may contain coatings that aren’t safe to eat.
Why are my sprouts soggy?
They might be sitting in water too long. Make sure your jars are draining fully.
Do sprouts need sunlight?
Only on the last day if you want to green them up. Otherwise, keep them in indirect light.
How long do sprouts last?
About 5 days in the fridge when stored dry with paper towels. I usually grow small batches so I can enjoy them while they’re at their best.
Can kids help?
Absolutely! It’s a fun, educational project. Sophia loves checking on them each morning—it’s like having a tiny kitchen garden.
Pin It For Later

Food Photography & Video Tips from My Studio
Here’s a peek at the tools, gear, and camera setups I use to film my recipe videos and photograph food at home. Over the years, I’ve tested dozens of different setups, and now I’m sharing what actually works for me—whether I’m filming overhead shots for YouTube or styling still photos for my blog. If you’re curious about how I create the content you see here, these posts are a great place to start.


Leave a Reply